
Adobe Lightroom is not as complicated as Photoshop and yet it would take a significant amount of time to master all the features. Sometimes features are not well publicised and go unnoticed. In this article, I’m going to show you some of those hidden gems that make Lightroom so great for editing images. Now if you get stuck you can always click on the link to the video where I show you how all of these work. CLICK HERE
Tip #1 - Reset
Now we know that there is this little button at the bottom of the page that resets the photo back to original settings. But what if you only want to reset certain things? There are 2 hidden tips to show you here. You could set all the sliders back to zero by manually changing the value or dialling in the values, or, you could double click on the name of the slider to set it back to zero. Just double click on the actual title next to the slider and see what happens.
But what if you want to do more than one at a time but not all of them. Well, you will notice that in Lightroom the sliders are organised into sections such as Basic, Tone Curve, HSL/Color and so on. Within those sections there are sub-sections. If you hold the Option/Alt key you will see that the names of the section change to allow you to reset only that section.
Tip #2 - Show me more.
This is an easy and quick tip. Rather than being distracted by all the sliders and controls in Lightroom, you can press the TAB key to make it all go away. Press the TAB key again to make them all appear again. Not good enough? No problem. Press the L key to partially dim everything else. Press the L key again to make it all go away. To bring it back simply press the L key again.
Tip #3 - Show selected mask overlay
We all know that we have the brush tool to make small changes to specific parts of our images. But how to do you know that you are working on only the area that you are trying to change? This is where you turn on the Show selected mask overlay feature. This will highlight the area that you are painting in red to show you where your changes are affecting the image. While on the topic of the brush tool, here are some additional tips you may not be aware of. While using the brush tool, you can tick the Auto Mask function. Lightroom will try to help you to keep your brush strokes within the limits of what you are painting. It is not 100% accurate but it is accurate enough to make it an effective tool. If you are using the brush on something that is already red then you may want to change the colour of the brush so you can see it. Click Shift, Command, O (Shift, CTRL, O on PC) this will change the colour of your mask to a different colour. This also works on the graduated filter. But what if you want to be super accurate? I only want the yellow parts of the image to be affected by my brush. In this case, first, select the brush tool and click on the area you want to change, you can set a range mask by clicking here.

This lets you use the eye drop tool to select the colour you want to affect. Click the eye drop tool, select the colour and then click the eye tool again to disable it. Once you do this and you click the Auto Mask function, your brush will only affect the selected colour.
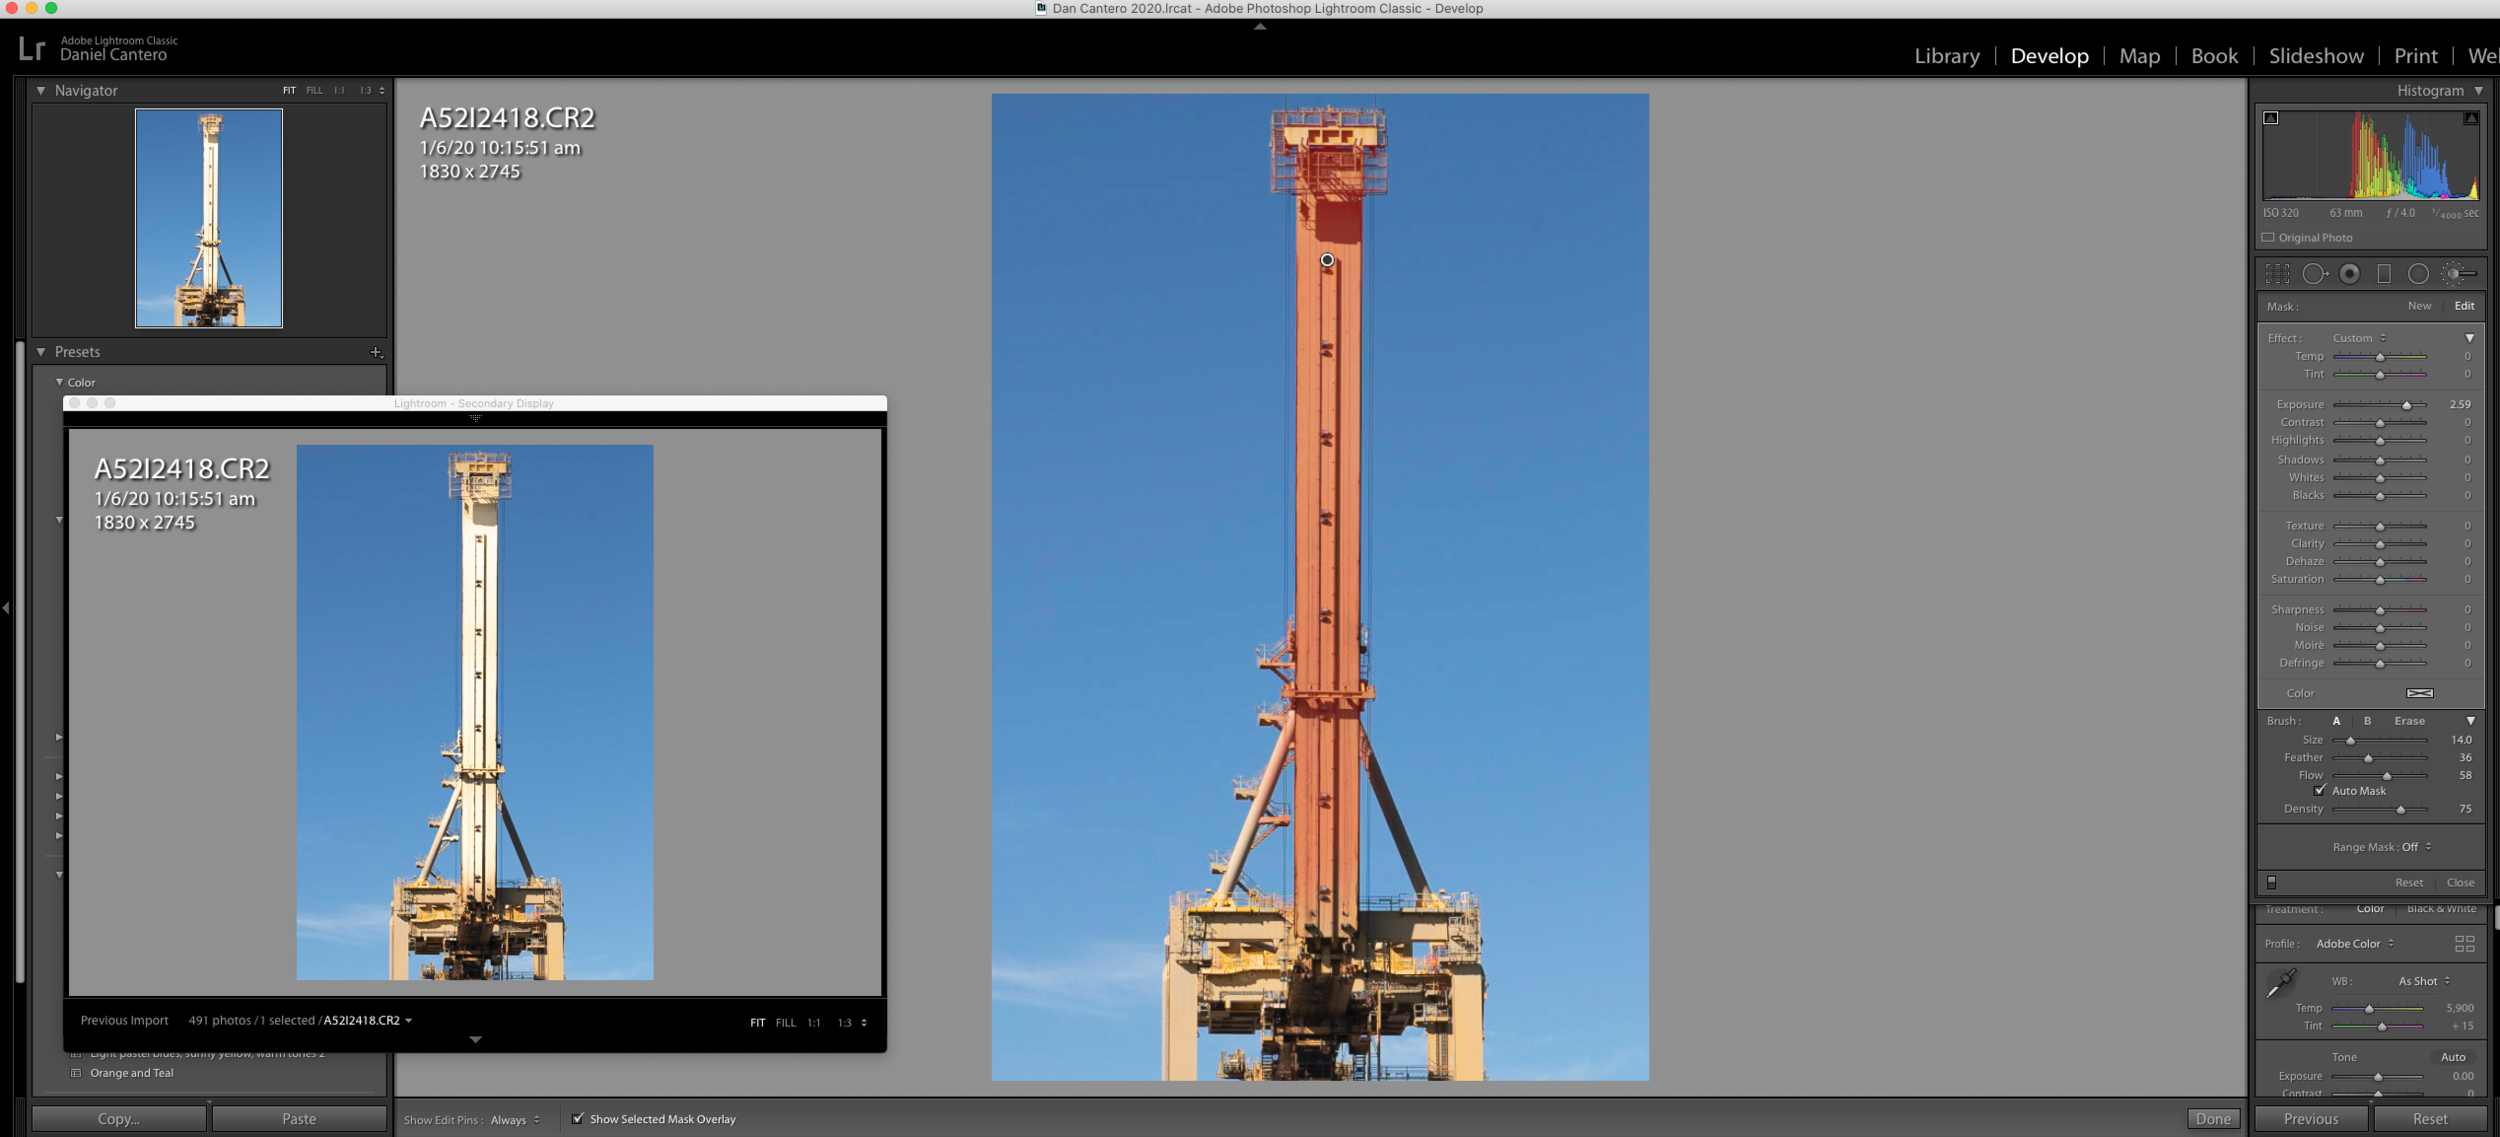
Tip #4 - Second monitor
I’ve never actually seen anyone else use this feature and I don’t know why because it is really useful. It is the second screen feature you can find on the bottom left of the screen.

Clicking on the 2 will enable the second screen. I primarily use this with the brush tool but you could use whichever way you want. Let’s fire up an image where we want to brighten only the yellow crane in this photo.

So for this, we are going to use a brush and turn on “Show selected mask overlay” that we discussed in the previous tip. We are going to start painting and because we have the overlay mask turned on we can see where we are painting. But in order to see the effect that the brush is having on the image, we have to turn off the overlay, examine the result and then turn it back on again. To get around this switch on the second monitor. Your main screen will show the area being painted by the brush and the second monitor will show the effect on the image.
Tip #5 - What am I changing?
When using the sliders it can sometimes be difficult to see exactly what your changes are doing. This is my best tip. Let’s take the exposure slider. You can slide it left and right and make the image darker or brighter. How do you know when you’ve gone too far and lose details in the highlights or the shadows? Well, you can enable the highlight and shadow alerts in the histogram but you might now want to have those on all the time.

Instead, you can hold the Option (Control on mac) key to show you live when you are losing details. It will look a little funky when you try it but you will how useful this is. This also works with some of the other sliders like the sharpening tools. Experiment with the sliders to see how you can make use of them.